Home
Studies
& Data Analysis
Methods
Microscope studies
Flagella experiment
Laboratory math
Blood fractionation
Gel electrophoresis
Protein gel analysis
Mitochondria
Concepts/ theory
Keeping a lab notebook
Writing research papers
Dimensions & units
Using figures (graphs)
Examples of graphs
Experimental error
Representing error
Applying statistics
Principles of microscopy
Solutions & dilutions
Protein assays
Spectrophotometry
Fractionation & centrifugation
Radioisotopes and detection
Guide to the study
Lab part 1
Lab part 2
Lab part 3
Selected methods
Preparing SDS Gels
A gel of given acrylamide concentration separates proteins effectively within a characteristic range. Very large polypeptides cannot penetrate far into a gel and thus their corresponding bands may be too compressed for resolution. Polypeptides below a particluar size are not restricted at all by the gel, and regardless of mass they all move at the same pace along with the tracking dye. Gel concentration (%T) should be selected so that the proteins of interest are resolved.
A typical gel of 7% acrylamide composition nicely separates polypeptides with molecular mass between 45 and 200 kDa. Polypeptides below the cutoff of around 45 kDa do not resolve. A denser gel, say 14%T, usually resolves all of the smallest polypeptides in a mix. Such a gel would be needed to resolve hemoglobin, for example. It would be useless for resolving bands much above 60 kDa, though. To analyze the entire profile of a fraction that contains heavy and light polypeptides, one should usually run two gels.
In the teaching lab we recommend that alternate teams prepare low or high percent gels, with each team exchanging samples with a team that prepared the other type gel. Each team, then, would load its set of samples, appropriate standards, and another team's samples on its gel, and have its samples loaded onto another percent gel as well. In addition to expanding the range of resolution of bands, this practice allows comparison between identical fractions prepared by different teams, to control for inconsistencies in fractionation, sample preparation, etc.
Cassettes
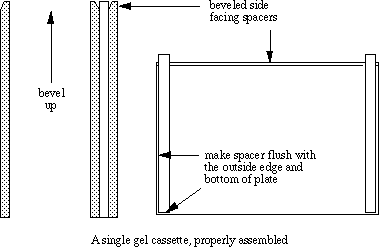
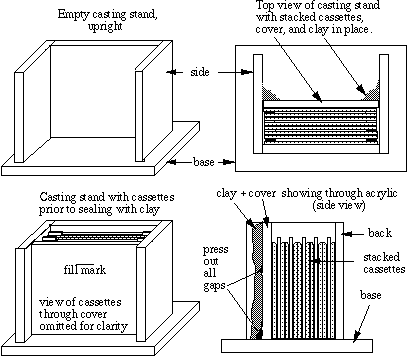
There are many systems for setting up gel cassettes, some of which are quite expensive. A simple 'mini-slab' gel system can be put together for a surprisingly little amount of money and does the job quite well. Our teaching program has done well using projector slide cover glasses (Kodak cat. #140 2130) as cassette plates, with casting stand, running stands, combs and spacers supplied by Sam Lee Custom Crafting, P.O. Box 130973, Houston, Texas 77219, tel.#713-861-4636). The procedure described here employs that system.We use casting stands to prepare the mini-slab gels. Two clean plates with two teflon spacers make a single cassette. We stack the cassettes upright in the stand with the bottoms of the cassettes tight to the bottom of the stand, using modeling clay to seal a thick acrylic cover in place against the last cassette to make a water-tight chamber. Using a well-former (comb) as a template, we mark a fill line about a centimeter below the bottom of the comb for the height of the first (separating) gel solution.


Notes on cassette preparation
- The bevels are not essential, but they aid in the insertion of combs when the stacking solution is poured.
- Spacers can be straighted with a thin spatula after assembly.
- The stand must be upright, or else leaks are likely.
- Air gaps between clay and the front cover will result in leaks.
- Since acrylamide is toxic, the stand should be placed in a tray or on absorbent paper prior to pouring the gel mix, to confine any leaks.
Separating Gel Preparation
The total volume between the plates of our gel cassettes is ten ml, so if we prepare 10 ml separating gel mix per cassette we have more than enough. We typically prepare three cassettes per stand and use the best one of the three. From 30% acrylamide stock (see notes below) we prepare gels of composition 7 to 15% acrylamide, depending on the range of proteins that we wish to separate. Our separating gel buffer stock (4x concentrated) consists of 0.4% SDS, 1.5 M Tris-Cl, pH 8.8. Per cassette, we mix 2.5 ml buffer stock and sufficient acrylamide stock so that when the mix is brought to final volume with distilled water we have the desired percent acrylamide monomer.
Acrylamide polymerizes spontaneously in the absence of oxygen, so the polymerization process involves complete removal of oxygen from the solution. Polymerization is more uniform if the mix is de-gassed to remove much of the dissolved oxygen, by placing it under a vacuum for 5 minutes or so before polymerization. We initiatiate polymerization by adding freshly prepared10% ammonium persulfate (AP) to the mix followed by N, N, N', N'-tetramethylethylenediamine (TEMED). The amounts of each depend on the quality of acrylamide used, and should be determined in advance by trial and error. We usually start with 100 µl AP and 10 µl TEMED per 10 ml gel mix, and see how it goes. Once the catalysts are added, polymerization may occur quickly, thus it is necessary to have the casting stand completely ready and to have the overlay solution ready to go (see below). After swirling to mix, we simply pour the solution into the space occupied by the cassettes. The cassettes will self-level eventually, but leveling can be hurried along by adding solution to selected cassettes with a pasteur pipet. Excess solution can be removed by tipping the apparatus and pulling off the excess with a pipet, so that the final level is at the fill mark.
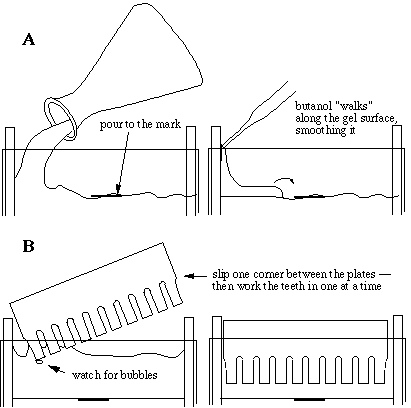
Immediately after pouring the gel mix, it must be overlaid with water-saturated butanol to an additional height of 0.5 cm or so (butanol is the top layer in the stock container). Adding butanol to a single cassette will drive the acrylamide mix down, raising the level in the others, so care must be taken to distribute the butanol equally among the cassettes. The purpose of butanol is to produce a smooth, completely level surface on top of the separating gel, so that bands are straight and uniform. Butanol holds very little water in solution, forming a neat layer on top, which is why we use it. Water would make an effective overlay but would mix with the acrylamide solution, diluting it. In fact, the butanol we use is saturated with water so that it does not dry out the gel mix.
Polymerization can be confirmed by pulling some of the remaining gel mix into the pipet, allowing it to stand, and checking it after 10 min or so. When the gel mix can no longer be expelled by squeezing the bulb, the separating gel is set. It should not take more than 15 minutes for any of the gel mixes to polymerize. If it hasn't gelled by that time, something is probably wrong. Often, first time "gel makers" are misled into thinking the gel hasn't polymerized because the top 0.5 ml or so of the gel mix does not set (some oxygen reaches it through the overlay).

Stacking gel preparation
Ten ml of stacking gel mix is sufficient for three of our cassettes, however for the sake of accuracy it may be preferable to make 20 or 30 ml. Excess can be rinsed and tossed into a wastebasket after it polymerizes. It isn't necessary to degas a stacking mix, because the stacker is simply designed to perform as a matrix through which samples will pass as they are caught up between moving boundaries. It is not designed for uniform separation of proteins. Our stacking gel buffer stock consists of 0.5 M Tris-Cl, pH 6.8, with 0.4% SDS. Typical stackers are 3 to 4.5% acrylamide. We use 4% in order to permit stacking of very large proteins and still retain sufficient mechanical strength to make good sample wells.
Before adding the final two components, which will start polymerization, the butanol should be poured off the separating gels into a sink with tap water running and excess butanol/acrylamide removed from the surfaces with a pipet. We use AP and TEMED in similar proportions as for the separating gel mix, although we sometimes increase the amount of one or both components since lower percentage acrylamide solutions tend to polymerize more slowly. After adding AP and TEMED we immediately swirl the mix and pour it into the cassettes to the tops of the plates. We insert combs one at a time, taking care not to catch bubbles under the teeth, and adjust to make them even if necessary, scraping excess stacking mix off later.
Notes on gel preparation
- Acrylamide is a toxic substance so use care and wear gloves while handling solutions that contain it. Use in a well ventilated area, and report any spills. Stock solutions should be kept in a fume hood.
- An erlenmeyer flask is good for mixing acrylamide, since the narrow neck can be stoppered to prevent toxic fumes from excaping. The wide bottom allows for a large surface area, so that oxygen can be quickly removed from the solution when it is placed under a vacuum.
- Acrylamide gel stock is labeled according to acrylamide monomer content. Our formulation uses an acrylamide stock of 29.2% acrylamide and 0.8% bis-acrylamide, the cross-linker (cross linking gives the gel its mechanical stability). The stock solution is labeled 30% T (29.2 + 0.8 = 30), 2.5% Cbis (0.8 is 2.5% of 30).
Visitors: to ensure that your message is not mistaken for SPAM, please include the acronym "Bios211" in the subject line of e-mail communications
Created by David R. Caprette (caprette@rice.edu), Rice University 14 Aug 96
Updated 24 May 05
