Links to files on the current site
Home
Syllabus
Lab methods
Assignments
Supplemental pdfs
|
Preparing spread plates
Our objective is to spread a small volume of liquid sample over the surface of an agar plate so that colony-forming units (particles that include one or more living bacterial cells) are distributed uniformly.
Problem. How do we spread a small liquid sample over a large surface without contaminating the plate?
One solution. Roll sterile round glass beads over the surface to spread the liquid evenly, then dump out the beads before incubating the plate.
Applications. In addition to obtaining separate colonies to obtain bacterial isolates, spread plates are used to by molecular biologists to quantify bacterial concentrations and in water quality analysis to estimate bacterial concentrations in lakes, beach waters, etc.
NOTE: because we are using these plates solely to obtain bacterial isolates we are not as concerned about pipetting accuracy as we would be if we were quantifying bacterial concentrations. Otherwise, we would use smaller volume pipettes, e.g., 0.2 ml pipettes, to deliver 2 volumes of 0.1 ml each.
Procedure
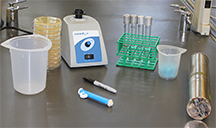
Here we describe how to introduce the sample and glass beads to an agar plate, how to remove the beads, and how to incubate the plate. On lab bench (figure 1):
- 1L plastic beaker for disposing of beads
- Stack of R2A agar plates, left in a laminar flow hood overnight to lose some moisture
- Vortex mixer
- Tube rack with diluted water samples
- Container of Eppendorf tubes, each with 6-12 sterile glass beads
- Container of sterile 1 ml pipets
- Sharpie marker and blue Pi pump
 |
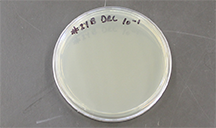 |
| Fig 1. (left) Supplies for preparing spread plates. (right) Agar plate with bottom up, labeled. |
Label each plate with the dilution ("-1" for 10-1, "-2" for 10-2, etc.) and your initials. We label the bottom of each plate, not the lid, because the lid may later become separated from the bottom. Keep your labels small and mark near an edge so that the writing doesn't obscure your view of the agar surface. You will need a clear view of the colonies growing on the plate in order to distinguish and rescue unique colony types.
Spreading samples
Plan to inoculate two R2A agar plates per dilution, each with 0.1 ml sample.
- Turn over the two plates labeled "-1" so that the lid is up. The label "-1" refers to a 1 to 10, dilution.
- Aseptically remove a 1 ml pipet from the canister and fit it to your Pi pump. "Aseptically" in this case means to avoid contact between a non-sterile surface (pretty much anything) and any part of the pipette that will go into the tube.
- Holding the pump in your right hand (if you are right-handed), lift the tube with 1 to 10 dilution from the rack with your left hand. There is no need to vortex the tube if you do the plating within a few min of making the dilutions.
- Use the little finger of the hand holding the pump to lift the cap from the tube, and rest the bottom of the pipette on the bottom to ensure that you draw only liquid and not air.
- Remove 100 µl sample* and replace the cap.
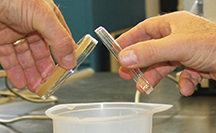
- Lift the lid from a plate just enough to allow you to position the tip of the pipet over the center of the agar surface, and deliver the sample. Quickly replace the lid and repeat for the second plate, using the same pipette.
*With experience you may save time by drawing up 200 µl at a time to deliver 100 µl per plate.
Note that it is absolutely essential to protect the interiors of our plates from contamination from dust particles and other matter in the air by keeping the lids on except when we need access to the interior. Even then, we lift a lid no farther than we have to. Unless you plan to discard the plate, never remove the lid completely and leave it off.
 |
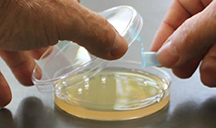 |
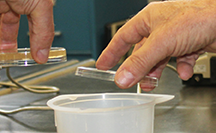
| Fig 2. (left) Adding sample to the agar surface; notice that the lid is kept over the open plate to limit opportunities for contamination. (right) Lift the lid just high enough to pour sterile beads onto the surface, then quickly close the lid. |
- Pick up an Eppendorf tube with sterile glass beads, open the cap, lift the lid off one of the plates that you just inoculated, and pour the beads onto the agar surface. Quickly replace the lid.
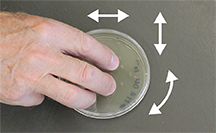
- Keeping the bottom of the plate in contact with the bench, vigorously shake the plate in two dimensions for 10 to 15 seconds to move the beads randomly over the surface. As the beads roll over the surface they will distribute the sample evenly throughout the plate.
- Pick up the plate, turn it over with bottom up, and tap the bottom so that the beads drop onto the inside of the lid.
- Over the 1 liter beaker, remove the lid and turn both the lid and the plate bottom so that the inside surfaces face down (minimizing the risk that a contaminant might land on the surface).
- Drop the beads into the beaker. You may have to tap the lid against the side or top of the beaker to release the beads. You won't contaminate the lid if only the lip touches the beaker and not any part of the interior. Quickly put the lid back onto the bottom and set it on the bench, inverted (lid down, bottom up). Do not discard the beads. We sterilize and re-use them.
- Repeat for the remaining dilutions, then incubate the plates under the selected conditions. Our protocol calls for incubating our plates aerobically, one set at 35 ± 0.5˚C and the other set at room temperature, for 48 hours.
 |
 |
 |
 |
| Fig 3. (top left) With lid up, hold the plate flat on the bench and shake in random directions to move the beads over the surface, spreading the sample. (top right) With plate upside down, tap the bottom to drop the beads onto the inside of the lid. (bottom left) Open the plate with agar surface and inside of the lid facing down. (bottom right). Drop the beads into the 1L plastic beaker. |
|
