Links to files on the current site
Home
Syllabus
Lab methods
Assignments
Supplemental pdfs
|
Making serial dilutions
A conventional way to obtain bacterial isolates from an environmental sample is to prepare a liquid suspension of the sample, make serial dilutions, then spread a small volume of each dilution onto one or more agar plates. We then isolate cultures from the colonies that grow on the agar surface.
Problem. The concentration of bacteria in a typical undiluted sample is so high that colonies growing on an agar plate prepared from that sample will be far too crowded to permit identification and isolation of unique colony types.
Solution. Rather than try to guess how much we need to dilute the sample, we spread agar plates with progressively more dilute samples. At least one dilution will result in well separated colonies, enabling us to collect isolates.
Applications. Serial dilutions are a relatively uncomplicated way of optimizing the concentration of a solution or mixture when we don't know the starting concentration, the optimum concentration, or either. In addition to using the method to reduce the concentration of microscopic organisms, we might use it to prepare calibration standards, obtain working titers of an antibody or drug, etc.
NOTE: because we are using these plates solely to obtain bacterial isolates we are not as concerned about pipetting accuracy as we would be if we were quantifying bacterial concentrations. Otherwise, we would use a 1 ml pipette to deliver a 1 ml volume.
Procedure
Here we describe a way in which to prepare stepwise dilutions of a liquid sample, to be used for spreading samples on agar plates.
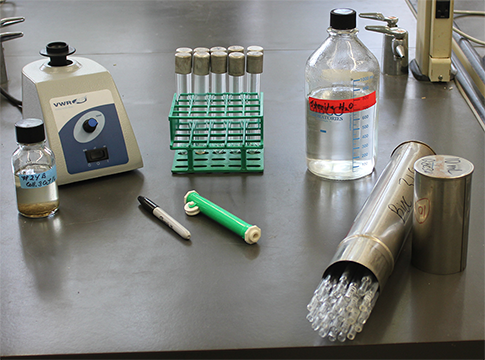
On lab bench you will find:
- Empty 20 mm x 150 mm capped culture tubes, in a plastic rack
- Bottle of sterile deionized water
- Green Pipette pump and container w/10 ml pipettes
- Sharpie marker (for labeling tubes)
- Water sample in labeled 100 ml bottle
You will use these supplies to make four serial dilutions. You'll start by preparing dilution blanks, then you will mix 1 ml sample with 9 ml sterile water to give a 1 to 10 dilution. Next you will take 1 ml of your 1 to 10 dilution and mix it with 9 ml water in a second tube to give a 1 to 100 dilution, and on down to a 1 to 10,000 dilution.
Note that all of these procedures must be conducted aseptically. There are lots of bacteria on dust particles floating in the air around you. To minimize the risk of contaminating your samples, try to work quickly. Try to minimize the time during which a vessel is open and/or a pipette is exposed to the air. Handle a pipette only by the back end, so you don't contaminate the part that goes into a bottle or tube.
 |
 |
| Figure 1. (left) Supplies needed for making dilutions. (left center) Pipette dipped in sterile water with tip touching the bottom. (right center) Move the thumbwheel down to draw up the liquid and down to expel it. (right) To limit the risk of contaminating the contents, remove the cap just long enough to introduce the pipette tip and deliver the liquid. |
Preparing dilution blanks
- Loosen the screw cap on the bottle of deionized water so that it can be lifted straight off.
- Open the pipette container, leaving it on its side, and shake out the pipettes so that they extend a few cm from the end. We want the pipettes to remain mostly in the container so that all but the top parts remain sterile. Have the mouth of the can extending slightly over the edge of the bench, so the pipette back ends aren't resting on the bench.
- Carefully remove one pipette, trying not to touch the others with your fingers, and fit it snugly into the seal of the pipette pump, in a position such that you can see the numbers when holding the pump. We always use some type of pipette aid to draw up and expel liquid. NEVER pipette by mouth.
- Hold the pipette pump with pipette firmly attached and place your thumb on the control wheel. Roll the thumbwheel downward to raise the plunger a few mm above the top of the barrel so that you will be able to eject the entire volume when you deliver the contents. Use the other hand to lift the cap off of the bottle of sterile water and insert the pipette into the water with the tip well below the surface.
- Fill the pipette to the 9 ml mark by rolling the thumb wheel downward. It's easiest to fill it to a little above the desired line, and then move the meniscus down to the desired line by gently rolling the thumb wheel upward.
- Lift out the filled pipette, immediately put the cap back on the water bottle, and lift the cap off of one of the dilution tubes.
- Place the pipette an inch or so into the tube with the tip touching the glass and expel the liquid from the pipette into the tube by rolling the thumb wheel upward.
- Lift the pipette out and immediately replace the cap on the tube.
- Repeat for the remaining three tubes. If you don't contaminate your pipette you can continue to use the same one. Replace it if you think it is no longer sterile.
All of the pipettes that we will be using are "blowout pipettes." That is, you fill the pipette to the desired volume and then blow all of the contents out of the pipette to deliver the correct volume.
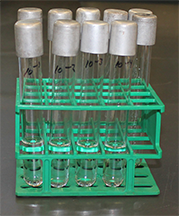 |
| Figure 2. Four dilution blanks, labeled and filled. |
Making the serial dilutions
- As you make dilutions, it's best to set up the tubes so there is an empty space in the rack next to the dilution tubes. You can keep track of where you are by moving each tube over one space after you have completed the dilution.
- With cap secured, shake up the bottle containing your water sample to mix it thoroughly and then loosen the cap so that you can pull it straight off.
- You will want a fresh pipette because the first one has been out for awhile. Remove the used pipette and place it into the pipette bucket. Load a fresh sterile pipette into your pipette pump as you did previously.
- Remove the cap from your sample bottle and insert the tip of your pipette so that it touches the inside bottom of the bottle. Pull up 1 ml of sample by moving the thumbwheel downward as you did previously.
- Remove the pipette and replace the cap.
- Remove the cap from the first dilution tube and place the pipette into the tube so its tip is just above the surface of the water. Expel the liquid from the pipette directly into the liquid in the tube by rolling the thumb wheel upward. Lift the pipette out and immediately replace the cap on the tube.
- Thoroughly mix the contents of the tube using a Vortex mixer.
- Load up a fresh pipette and continue by diluting 1 ml from the first dilution tube into the next dilution tube to make your 1 to 100 dilution, and repeat for the remaining tubes, each time using a fresh pipette. Remember: we must not use the same pipette to transfer different solutions or different dilutions of the same solution.
We now have four dilutions of our original sample, each approximately ten times more dilute than the previous dilution. We can now spread a small volume of each solution onto one or more agar plates. At least one dilution will give us a manageable number of individual bacterial colonies.
|
