
Welcome page
Timetable
Background
Methods
- Rules
- Media/culture
- Aseptic technique
- Staining/interpretation
- Isolation strategies
- Assays/characterization
- Microscopy
- Cultural characteristics
Media preparation
and training
Observing Bacteria with a Nikon Labophot Microscope
The information on this page is for your reference. It is not intended to substitute for hands-on training in the use of these microscopes. Before using any microscope, please pay careful attention to its care and proper use. To do well in this course you should master the observing techniques described on these pages in order to work efficiently and succeed in characterizing your bacterial isolates.
Contents
Care of the microscope
Optical surfaces; operation
Available optics
Basic components; bright field optics; dark field optics; phase contrast
optics
Using the microscope
Mount the specimen; select objective lens and condenser position; locate,
focus, and center the specimen; increase the magnification; suggestions
for finding specimens
Using an oil immersion lens
Principle; method; cautions
Using an ocular reticule
Care of the microscope
Our microscopes are more than two decades old but they are far better than any student model microscope that you might find. You are responsible for the condition of the microscopes under your care, so please read carefully.
Optical surfaces. Optical surfaces include field lens, daylight filter, condenser lens, objective lens, and eyepieces. Never use any kind of organic solvent on an optical surface. Never scrub the surface or use any abrasive material to clean it. When a surface becomes dirty we use distilled water and either good quality lens tissue or a cotton Q-tip. If a Q-tip is used it must be 100% cotton, no synthetic components. Dab water onto the surface then dab the surface dry. If water is not sufficient you may use a dilute solution of acetic acid on the lens. Anything harsher will damage the lens coatings and ruin its performance. Cleaning materials will be out at the bench.
Operation. Exercise care when putting the microscope into the working position. Dropping the eyepiece tube will ruin it - they can't be realigned. When finished, dab any immersion oil off of the 100x objective(s) and check the 40x as well. Turn off the lamp, retract the binocular eyepiece tube, put the 4x objective into place, and replace the dust jacket. Be extremely careful with "long" objective lenses not to drive a lens into a slide. Use the coarse focus with the 4x and 10x objectives and fine focus only with the 40x and 100x objectives. Focus smoothly, and if you encounter excessive resistance then stop. The same goes for adjusting condenser position.
Basic components
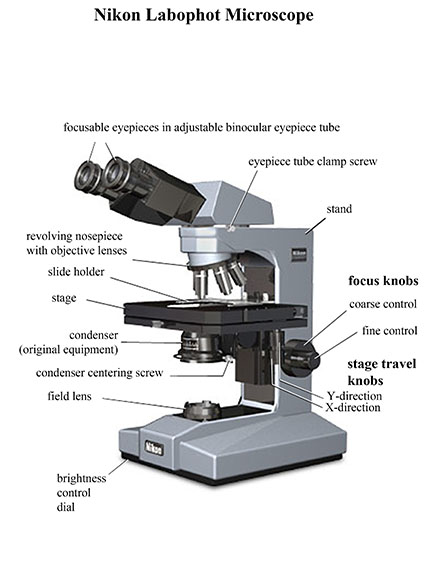

Visible light passes through a condenser lens that modifies the light path, then the light passes through a specimen and into an objective lens that magnifies the image. The magnified image is projected toward a pair of oculars (eyepieces) that magnify the image another 10x. The basic components include:
- focusing controls
- a choice of objective lenses (4x, 10x, 40x, and 100x)
- a mechanical stage to control specimen position
- a base illuminator control for illumination intensity
- a rotating condenser turret, providing a selection of settings that allow you to select bright field, dark field, or phase contrast optics
- an aperture diaphragm (bright field only) to control contrast and resolution
- an adjustable binocular eyepiece tube
- focusable oculars (eyepieces)
- an ocular reticule for making measurements
Available optics
Note that the 4x, 10x, and 40x objective lenses are all "dry" lenses, meaning they are not to be used with immersion oil. All of our 100x objective lenses are oil immersion lenses.
Bright field optics. Visible light passes directly through the specimen, which is visible only if it is pigmented and/or dense enough to absorb significant light. One observes the specimen against a bright background. One must use bright field optics at 1000x final magnification to obtain sufficient resolution to make Gram stain determinations.
To work in bright field:
- Set condenser turret position to "0"
- Adjust illumination using the brightness control dial in the base (more light needed for higher magnifications)
- Adjust aperture diaphragm for optimum contrast and resolution
Dark field optics. An occulting disk placed in the light path below the condenser lens prevents light from passing directly through the plane of the specimen into the objective lens, producing a dark field if there is no obstruction in the light path. An object in the light path refracts some light into the objective lens, producing a bright image against the dark field. Dark field is extremely useful for finding living bacteria in wet mounts and checking for motility at low final magnifications (40x, 100x). We cannot obtain dark field at 1000x final magnification (100x objective).
To work with dark field:
- Set condenser position to "ph4" (4x and 10x objectives), or "DF" (40x objective)
- The condenser is mounted on a focusable rack, allowing it to be lowered for cleaning; make sure that the condenser is in the raised position, with lens almost flush with the opening in the stage
- Adjust the illumination to maximum, using the brightness control dial
Phase contrast optics. An annular ring in the condenser produces a cone of light that passes through the specimen, parts of which refract the light, altering its path and taking it partially out of phase with unobstructed light. In the objective lens a phase plate further alters the obstructed light and recombines it with unobstructed light, producing interference. Phase contrast optics reveal the presence of spores and are best for revealing the true shapes of cells (rods vs. cocci, for example).
- Set the condenser position to "ph3" (40x objective) or "ph4" (100x objectives with phase elements)
- Use the phase centering knobs to align the condenser turret with the objective lens elements
- Rotate one knob at a time to obtain the best contrast, OR
- Replace an ocular with a phase telescope, focus so that a bright white ring is visible, use the centering knobs to make the white ring concentric with the black ring, then replace the ocular
- 100x phase contrast objectives have a red band
- 100x objectives with a white band are for bright field only
- Adjust the illumination to maximum
Using the microscope
First, think about your objectives. What are you looking for? What minimum magnification will you need? What type optics will best provide the information that you need?
Mount the specimen on the stage. Bacterial smears usually don't require a cover slip but the smear must be up. We use a cover slip on wet mounts.
Select objective lens and condenser position. You have to find the specimen first. Start with low magnification (40x or 100x) and consider the nature of your specimen (e.g., stained or unstained) when selecting the starting optics.
Locate, focus, and center the specimen. At the lowest magnifications stained bacteria look like dirt on the slide. As a drop dries, suspended particles tend to concentrate somewhat in concentric rings. Find material that looks like it is in the right place and is non-randomly oriented. It takes some practice to become efficient at finding some specimens, especially Gram negative bacteria.
Increase the magnification. Focus and center at low magnification. Rotate the next highest objective into place, choose the most appropriate optics for that lens and type of specimen, and again focus and center. Repeat until you reach the magnification that you need. See below for special instructions on using an oil immersion (100x) lens. Here are some suggestions for finding difficult specimens.
- Use dark field mode to find unstained specimens at low magnification. Use dark field or high contrast (aperture diaphragm closed down) for stained specimens.
- Start with the specimen out of focus so that the stage and objective must be brought closer together. The first surface to come into focus as you bring stage and objective together is the top of the cover slip (wet mount) or top of a smear.
- If you are having trouble with a wet mount, focus on the edge of the cover slip or an air bubble, or something that you can readily recognize. The top edge of the cover slip comes into focus first, then the bottom, which should be in the same plane as your specimen.
- Ensure that a smear is on top of the slide or you will not be able to focus. If you are having great difficulty finding the specimen try focusing on the bottom of the slide, on the scratch that you made to mark the position of the smear. Lower the stage and the next plane to come into focus will be the plane of the specimen.
- The depth of focus at 1000x magnification is extremely shallow. One can focus right through the plane and never spot the specimen. Practice on large Gram (+) specimens first, and develop a feel for the direction to turn the fine focus control and about how far to turn it when changing from 400x to 1000x. For Gram (-) specimens you may have to stop down the aperture diaphragm to locate specimens then readjust for observing.
Using an oil immersion lens
Principle. Because the components of visible light refract at different angles when passing from air to glass or glass to air, resolution deteriorates markedly at magnifications above 400x. In fact, your view is surprisingly distorted even at 400x in bright field mode. With oil immersion we place a drop of oil with greater refractive index than glass between specimen and lens. With the oil we then can optimize contrast and resolution using the condenser aperture.
Method. First, bring the specimen up to 400x and ensure that it is focused and centered. The field of view at 1000x is quite small. Pace a generous drop of immersion oil on the cover slip over the illuminated area directly onto the smear. Very carefully swing the oil immersion lens into place. Focus carefully, preferably by observing the lens itself while bringing it as close to the cover slip as possible, then focusing by moving the lens away from the specimen.
Cautions. When in focus the lens nearly touches the specimen. The focal plane is so narrow that it is very easy to focus right past it. If you are focusing toward the specimen, you can drive the lens right into it. With oil on the specimen you must not go back to using the 40x objective or you will foul the surface. Rotate the objective turret the other way if you must observe at a lower magnification.
Using an ocular reticule
Each microscope is equipped with an ocular reticule (micrometer scale) in the right eyepiece. To measure specimens you can rotate the ocular in its tube to orient it in the same direction as the dimension to be measured, and using stage controls to bring the target to the reticule. Count the number of divisions spanning the length to be measured and then convert to micrometers. Below are the conversions factors per smallest division at the magnifications that we use.
- 25 µm at 40x
- 10 µm at 100x
- 2.5 µm at 400x
- 1 µm at 1000x
Be aware that even under the best of circumstances the limit of resolution of your microscope is 1 or 2 µm (or worse) at any dry magnification, and 0.5 µm or so using oil immersion. No directly measured linear dimension or value that is calculated from a linear dimension should be reported with implied accuracy that is better than that.
Created by David R. Caprette (caprette@rice.edu), Rice University 27 Dec 10
Updated 17 Jul 14
Copyright and Intended Use